<?xml version="1.0" encoding="utf-8"?><feed xmlns="http://www.w3.org/2005/Atom" ><generator uri="https://jekyllrb.com/" version="3.10.0">Jekyll</generator><link href="https://sudb92.github.io/blog/feed.xml" rel="self" type="application/atom+xml" /><link href="https://sudb92.github.io/blog/" rel="alternate" type="text/html" /><updated>2025-05-12T11:07:27+00:00</updated><id>https://sudb92.github.io/blog/feed.xml</id><title type="html">code pencil stubs</title><subtitle>a virtual box of coding notes-to-self</subtitle><author><name>sudb</name></author><entry><title type="html">CERN ROOT and Keyboard Event Handling in TCanvas</title><link href="https://sudb92.github.io/blog/2025/05/12/blog-post-title-from-file-name.html" rel="alternate" type="text/html" title="CERN ROOT and Keyboard Event Handling in TCanvas" /><published>2025-05-12T00:00:00+00:00</published><updated>2025-05-12T00:00:00+00:00</updated><id>https://sudb92.github.io/blog/2025/05/12/blog-post-title-from-file-name</id><content type="html" xml:base="https://sudb92.github.io/blog/2025/05/12/blog-post-title-from-file-name.html"><![CDATA[<ul>
  <li>As part of a longstanding quest, I have always wished to possess the capability to use single-keypress events on a <code>TCanvas</code> or a <code>TBrowser</code> in CERN ROOT to trigger actions.</li>
  <li>Handling a single keystroke, <em>a la</em> <code>getch()</code> of Borland C++ vintage, is straightforward enough, by using a construct like
<code>while(gPad-&gt;WaitPrimitive());</code>
peppered within the macro/program, which waits for a keypress in the active macro. If one wants the keypress while a particular <code>TCanvas</code> was active, that was straightfroward too, as
<code>while(canvas-&gt;WaitPrimitive());</code></li>
  <li>What used to elude my understanding was how to parse the return value of <code>gPad-&gt;GetEvent()</code> to recognize keystrokes in the first place, and secondly, what would allow me to get the result of the keypress.</li>
  <li>My very crafty coworker over at https://github.com/jmattspartacus told me the wonderful (but very cryptic) trick a few days back: type-casting to <code>char</code> the results of <code>gPad-&gt;GetEventX()</code> gives the ascii value of keypress events! This is a little infuriating, since GetEventsX() is used to track mouse X positions in events! Wth, ROOT?</li>
  <li>It turns out, one can also cast to <code>short</code> the results from <code>gPad-&gt;GetEvent()</code> to filter out keypresses by searching for the number 24. (Which is 42 flipped, makes sense.) <code>gPad-&gt;GetEventX()</code> and <code>gPad-&gt;GetEventY()</code> both store the same number, which when cast to <code>char</code> return the ascii value of the key pressed.</li>
  <li>All in all, the following macro if run with the usual
    <pre><code class="language-bash">root -l -x -q track_keypress_in_canvas.C
</code></pre>
    <p>should bring up a <code>TCanvas</code> with a histogram. Once you hover over the canvas, you can cycle through ROOT’s default colors by pressing ‘n’ and ‘p’. The title to the canvas will show the current color index.</p>
  </li>
  <li>Fun times! This use-case of <code>TCanvas::AddExec</code> will make a lot of basic user-interfacing a breeze to work with. And to think, this issue needed needless reverse engineering! Hope the people over at CERN ROOT advertise this, instead of hiding it away.</li>
</ul>

<pre><code class="language-C">
int cc=0;
TH1F h1("h1","h1",800,-400,400);

void myexec()
{
   // get event information
   short event = gPad-&gt;GetEvent();
   int px    = gPad-&gt;GetEventX();
   int py    = gPad-&gt;GetEventY();

   // some magic to get the coordinates...
   /*double xd = gPad-&gt;AbsPixeltoX(px);
   double yd = gPad-&gt;AbsPixeltoY(py);
   float x = gPad-&gt;PadtoX(xd);
   float y = gPad-&gt;PadtoY(yd);*/

   //if (event==1) { // left mouse button click, if needed
      //return;
   //}
   if(event==24 &amp;&amp; (((char)px =='n' || (char)px=='p'))) { //24 is keypress, px, and py are assigned characters
       //std::cout &lt;&lt; (int)event &lt;&lt; " " &lt;&lt; (char)px &lt;&lt; " " &lt;&lt; (char)py &lt;&lt; std::endl;
       if((char)px=='n') cc++;
       else cc--;
       h1.SetTitle(Form("Color:%d",cc));
       h1.SetFillColorAlpha(cc,0.4);
       gPad-&gt;Modified();
       gPad-&gt;Update();
       return;
   }
}


void track_keypress_in_canvas()
{
   gStyle-&gt;SetOptStat(0);
   h1.GetXaxis()-&gt;SetRangeUser(-5,10);
   TF1 f1("gauss",Form("%f*TMath::Exp(-(x-%f)*(x-%f)/(2*2.*2.))",1000.,2.,2.),2.-5,2.+5);
   h1.FillRandom("gauss",1000,nullptr);
   h1.SetLineWidth(2.0);
   h1.GetXaxis()-&gt;SetTitle("Hover mouse, press 'n' or 'p' to cycle colors");
   h1.Draw();
   gPad-&gt;Modified();
   gPad-&gt;Update();

   // add exec
   gPad-&gt;AddExec("myexec","myexec()");
}

</code></pre>]]></content><author><name>sudb</name></author><category term="Other" /><summary type="html"><![CDATA[As part of a longstanding quest, I have always wished to possess the capability to use single-keypress events on a TCanvas or a TBrowser in CERN ROOT to trigger actions. Handling a single keystroke, a la getch() of Borland C++ vintage, is straightforward enough, by using a construct like while(gPad-&gt;WaitPrimitive()); peppered within the macro/program, which waits for a keypress in the active macro. If one wants the keypress while a particular TCanvas was active, that was straightfroward too, as while(canvas-&gt;WaitPrimitive()); What used to elude my understanding was how to parse the return value of gPad-&gt;GetEvent() to recognize keystrokes in the first place, and secondly, what would allow me to get the result of the keypress. My very crafty coworker over at https://github.com/jmattspartacus told me the wonderful (but very cryptic) trick a few days back: type-casting to char the results of gPad-&gt;GetEventX() gives the ascii value of keypress events! This is a little infuriating, since GetEventsX() is used to track mouse X positions in events! Wth, ROOT? It turns out, one can also cast to short the results from gPad-&gt;GetEvent() to filter out keypresses by searching for the number 24. (Which is 42 flipped, makes sense.) gPad-&gt;GetEventX() and gPad-&gt;GetEventY() both store the same number, which when cast to char return the ascii value of the key pressed. All in all, the following macro if run with the usual root -l -x -q track_keypress_in_canvas.C should bring up a TCanvas with a histogram. Once you hover over the canvas, you can cycle through ROOT’s default colors by pressing ‘n’ and ‘p’. The title to the canvas will show the current color index. Fun times! This use-case of TCanvas::AddExec will make a lot of basic user-interfacing a breeze to work with. And to think, this issue needed needless reverse engineering! Hope the people over at CERN ROOT advertise this, instead of hiding it away.]]></summary></entry><entry><title type="html">Embedding CERN ROOT classes in Lua5.1 via tolua++</title><link href="https://sudb92.github.io/blog/2024/07/05/blog-post-title-from-file-name.html" rel="alternate" type="text/html" title="Embedding CERN ROOT classes in Lua5.1 via tolua++" /><published>2024-07-05T00:00:00+00:00</published><updated>2024-07-05T00:00:00+00:00</updated><id>https://sudb92.github.io/blog/2024/07/05/blog-post-title-from-file-name</id><content type="html" xml:base="https://sudb92.github.io/blog/2024/07/05/blog-post-title-from-file-name.html"><![CDATA[<ul>
  <li>
    <p><a href="https://web.tecgraf.puc-rio.br/~celes/tolua/tolua-3.2.html"><code>tolua++</code></a> is a wonderful tool that allows us to expose a small component of a larger C/C++ library like CERN ROOT to create a compact interpreter with friendlier syntax, no explicit typing, and all the other benefits that come with lua embedding - not least, faster prototyping.</p>
  </li>
  <li>
    <p>Unfortunately, there’s a small learning curve when it comes to implementing a working example of how said embedding is done. Upon encountering a helpful 
stackoverflow answer <a href="https://stackoverflow.com/questions/4482518/setting-up-an-environment-for-an-embedded-lua-script">here</a>, I retried this approach to finally
meet success. The following steps were taken to fill a <code>TH1F</code>, live-update a <code>TCanvas</code> object within a Lua loop, save the final result to a png, and exit.</p>
  </li>
</ul>

<h3 id="basics">Basics:</h3>
<ul>
  <li><code>tolua</code> and <code>tolua++</code> are present in Linux repositories, in my Ubuntu 22.04LTS installing <code>tolua++</code> was simple as
    <pre><code>sudo apt install libtolua++5.1-dev
</code></pre>
  </li>
  <li><code>tolua</code> and <code>tolua++</code> require a package file that has definitions of the requisite class features that need to be exposed. In what’s below, I’ll stick to tolua++5.1 and C++ classes alone,
 since these are most relevant for ROOT.</li>
</ul>

<h3 id="action">Action:</h3>
<ul>
  <li>The following file <code>root1.pkg</code>exposes all the features that I plan to use from ROOT’s class hierarchy : the <code>TH1F</code> to be filled, the <code>TCanvas</code> and <code>TApplication</code> for live updation within a loop. Note that I’ve also included all the classes that the exposed member functions require. Lua already knows about the standard C/C++ types. It is also important to note the <code>$</code> sign
before all the <code>#include</code> lines.</li>
</ul>

<pre><code class="language-C">$#include &lt;TH1F.h&gt;
$#include &lt;TCanvas.h&gt;
$#include &lt;TVirtualPad.h&gt;
$#include &lt;TApplication.h&gt;
$#include &lt;TObject.h&gt;

class TH1F {
public:
    TH1F(const char* name, const char* title, int nbinsx, double xlow, double xhigh);
    void Fill(double x);
    void Draw();
};

class TCanvas {
public:
    TCanvas(const char* name, const char* title, int wpx, int wpy, int ww, int hh);
    void SaveAs(const char* filename = "", const char* option = "") const;
    TVirtualPad* cd(int sub=0);
    TObject* WaitPrimitive(const char* pname="",const char *emode="");
    void Update();
    void Modified();
};

class TApplication {
    TApplication(const char* name, int* argc, char** argv, void* options=nullptr, int numoptions=0);
};
</code></pre>
<ul>
  <li><code>tolua++5.1</code> can help us convert the above pkg file into a pair of C++ header/source files, that can be used to compile a custom lua5.1 interpreter that ‘knows of’ the extra classes
exposed by root1.pkg, in addition to all the capabilities/definitions a regular lua5.1 interpreter brings (such as <code>os</code> and <code>io</code>, and other capabilities). This is accomplished by running in bash the following line. The output file names are arbitrary chosen as <code>hstub.cpp</code> and <code>hstub.hpp</code> keeping with the demo example link.</li>
</ul>

<pre><code class="language-bash">tolua++5.1 -H hstub.hpp -o hstub.cpp root1.pkg
</code></pre>

<ul>
  <li>If all goes well, the above step promptly creates the two files. Now, we prepare a <code>lua5.1</code> interpreter by creating the following <code>main.cpp</code> file and compiling it. I have smoothed out
the use of <code>extern C</code> via the more elegant syntax of including <code>lua.hpp</code> that comes with all modern versions of lua in package managers. The only additional step here is the inclusion
of <code>hstub.hpp</code> and the function <code>tolua_root1_open()</code> defined in <code>hstub.cpp</code>, to load all the additional definitions for use with the lua interpreter. Refer to the <code>tolua</code> manual for details on these.</li>
</ul>

<pre><code class="language-C">#include &lt;tolua++.h&gt;
#include "lua.hpp"
#include "hstub.hpp"

int main()
{
    lua_State *L = lua_open();
    luaL_openlibs(L);
    tolua_root1_open(L);

    if (luaL_dofile(L, NULL) != 0)
        fprintf(stderr, "%s\n", lua_tostring(L, -1));

    lua_close(L);
    return 0;
}
</code></pre>

<ul>
  <li>Now to compile the above, we finally require <code>g++</code>, complete with all the necessary includes of both Lua and CERN ROOT, and all the libraries. The compilation/build recipe here is:</li>
</ul>

<pre><code class="language-bash">g++ -I/usr/include/lua5.1 `root-config --cflags` main.cpp hstub.cpp -ltolua++5.1 -llua5.1 `root-config --glibs` -o root1
rm hstub.*
</code></pre>

<ul>
  <li>The above process creates the executable <code>root1</code> that is our lua interpreter. I delete the <code>hstub</code> pair since we no longer need them. We now create a Lua5.1 script that can be sent to the interpreter, that does what we set out originally to do:
make a <code>TCanvas</code>, fill a <code>TH1F</code> in a loop within it, live update it, and wait for a <code>Ctrl+C</code> before exiting. I’m calling the file <code>roottest.lua</code>, and it looks like this:</li>
</ul>

<pre><code class="language-lua">print("Calling ROOT via a lua script..\n")
app = TApplication("app",0,0)
c1 = TCanvas("c1","c1",0,0,800,600)
h1 = TH1F("test","test",100,0,1000)
c1:cd()
h1:Draw()
i=0
repeat
    h1:Fill(math.random(0,1000))
    c1:Modified()
    c1:Update()
    i=i+1
until i==1000
c1:SaveAs("test.png")
repeat 
    do end -- empty block, i.e. a 'nop'
until c1:WaitPrimitive()==0 
--only true when Ctrl+C is sent or 'Quit ROOT' is chosen on TCanvas
print("...done.\n")
</code></pre>

<ul>
  <li>Elegant, compact, quick-to-prototype. All things Lua is good at :) Sending the above file to the executable <code>root1</code> as</li>
</ul>

<pre><code class="language-bash">./root1 &lt; roottest.lua
</code></pre>
<p>should promptly bring up a live-updating histogram. Nice!</p>

<ul>
  <li>In case one now requires some other ROOT class or property to be exposed, all one needs to do is to edit <code>root1.pkg</code> to include the requisite header files and function declarations, re-run <code>tolua++</code> to generate updated <code>hstub.cpp</code>+<code>hstub.hpp</code> files, and recompile to update <code>root1</code>’s knowledge. Now, <code>roottest.lua</code> can use the additional classes/properties.</li>
</ul>]]></content><author><name>sudb</name></author><category term="Other" /><summary type="html"><![CDATA[tolua++ is a wonderful tool that allows us to expose a small component of a larger C/C++ library like CERN ROOT to create a compact interpreter with friendlier syntax, no explicit typing, and all the other benefits that come with lua embedding - not least, faster prototyping.]]></summary></entry><entry><title type="html">Simple demo of zlib API</title><link href="https://sudb92.github.io/blog/2024/06/28/blog-post-title-from-file-name.html" rel="alternate" type="text/html" title="Simple demo of zlib API" /><published>2024-06-28T00:00:00+00:00</published><updated>2024-06-28T00:00:00+00:00</updated><id>https://sudb92.github.io/blog/2024/06/28/blog-post-title-from-file-name</id><content type="html" xml:base="https://sudb92.github.io/blog/2024/06/28/blog-post-title-from-file-name.html"><![CDATA[<ul>
  <li>As part of my latest data analysis, I have been tasked with looking through a binary file compressed in the .gz format. The original analysis scheme looks through the uncompressed file - one
record at a time as follows (I have suppressed the original use-case for illustration purposes):</li>
</ul>

<pre><code class="language-C">// uncompressed.cxx
#include &lt;cstdint&gt;
#include &lt;stdio.h&gt;
#include &lt;fcntl.h&gt;
#include &lt;vector&gt;
#include &lt;algorithm&gt;
#include &lt;iostream&gt;
#include &lt;cassert&gt;
#include &lt;signal.h&gt;
#include &lt;unistd.h&gt;
#define MAXSIZE 32768

struct header {
  int type; int length; long long timestamp;
};

struct payload {
  int type;
  int errcode;
  int energy;
  int timestamp;
  int channel;
  double waveform[MAXSIZE];
};

bool quit=false;
void handler(int signal) {quit=true;}

int main() {
    /**
      Binary file input.dat contains data packed as header-payload-header-payload. The size of the payload is contained in the header, along with the timestamp and type information.
      We extract only type-1 data in the following, and make a vector of all the unique 'channels' present in the type1 payloads. The files can be huge, so it helps to be able to break out of
      the loop using Ctrl+C.
    */
    header head;
    char buf[32768];
    payload t1d;
    int fd = open("/path/to/input.dat",O_RDONLY);
    if(fd == -1) {
        printf("File data/input.dat not found! Exiting..\n");
        return -1;
    }
    std::vector&lt;int&gt; crystalids;
    int readstatus = 1;
    signal(SIGINT,handler);
    while(readstatus!=0) {
       readstatus = read(fd,(void*)&amp;head,sizeof(head));
       if(head.type==1) {
        readstatus = read(fd,(void*)&amp;t1d,head.length);
        if(std::find(crystalids.begin(),crystalids.end(),t1d.channel)==crystalids.end()) {
          crystalids.push_back(t1d.channel);
        }
       }
       else {
          assert(head.length &lt; 32768);
          readstatus = read(fd,(void*)buf,head.length);
       }
       if(quit) break;
    }
    for(auto&amp; x: crystalids) std::cout &lt;&lt; x &lt;&lt; " "  &lt;&lt; std::endl;
    close(fd);
    return 0;
}

</code></pre>

<p>Now, performance considerations aside, it is a pain in the neck to have to <code>gunzip -k</code> every input.dat.gz file just to be able to look through and do the above operation, then delete the result afterwards.
Fortunately for us, using the <code>zlib</code> library is said to be both less messy AND better optimized execution-time-wise. To directly read from input.dat.gz and do the same operation as above, simply use</p>

<pre><code class="language-C">//zlibdemo.cxx
#include &lt;zlib.h&gt;
#include &lt;vector&gt;
#include &lt;iostream&gt;
#include &lt;algorithm&gt;
#include &lt;signal.h&gt;
#include &lt;assert.h&gt;
#define MAXSIZE 32768

struct header {
  int type; int length; long long timestamp;
};

struct payload {
  int type;
  int errcode;
  int energy;
  int timestamp;
  int channel;
  double waveform[MAXSIZE];
};

bool quit=false;
void handler(int signal) { quit = true; }

int main()
{
    header header;
    payload g1;
    uint16_t junk[32768];
    std::vector&lt;int&gt; crystalids;

    gzFile infile = (gzFile)gzopen("/path/to/input.dat.gz", "rb");
    gzrewind(infile);
    signal(SIGINT,handler);

    while(!gzeof(infile))
    {
        int len = gzread(infile, &amp;header, sizeof(header));
        switch(header.type) {
            case 1: gzread(infile, &amp;g1, header.length);
                    if(std::find(crystalids.begin(),crystalids.end(),g1.channel)==crystalids.end()) {
                        crystalids.push_back(g1.channel);
                    }
                    break;
            default: assert(header.length&lt;32768);
                     gzread(infile, &amp;junk, header.length);
        }
        if(quit) break;
    }
    for(auto&amp; x: crystalids) std::cout &lt;&lt; x &lt;&lt; " "  &lt;&lt; std::endl;
    gzclose(infile);
    return 0;
}
</code></pre>
<p>Of course, the files are compiled as:</p>
<pre><code>g++ uncompressed.cxx -o uncompressed 
</code></pre>
<p>for the original file, and</p>
<pre><code>g++ zlibdemo.cxx -o zlibdemo -lz
</code></pre>
<p>for the zlib version. Everything in the first version is contained in standard C/C++ libraries, while the second version needs us to link to zlib’s shared libraries.</p>]]></content><author><name>sudb</name></author><category term="Other" /><summary type="html"><![CDATA[As part of my latest data analysis, I have been tasked with looking through a binary file compressed in the .gz format. The original analysis scheme looks through the uncompressed file - one record at a time as follows (I have suppressed the original use-case for illustration purposes):]]></summary></entry><entry><title type="html">My scratchpad for useful docker commands</title><link href="https://sudb92.github.io/blog/2024/04/04/blog-post-title-from-file-name.html" rel="alternate" type="text/html" title="My scratchpad for useful docker commands" /><published>2024-04-04T00:00:00+00:00</published><updated>2024-04-04T00:00:00+00:00</updated><id>https://sudb92.github.io/blog/2024/04/04/blog-post-title-from-file-name</id><content type="html" xml:base="https://sudb92.github.io/blog/2024/04/04/blog-post-title-from-file-name.html"><![CDATA[<p>(because the documentation sometimes gets too irritating)</p>

<hr />
<p>Dockerfile example:</p>
<pre><code># Sample dockerfile to illustrate how to setup a self-contained myprogram install. I'm using myprogram.contourer without GUI as a demonstration.
# 1) Install docker in the system
# 2) Create a folder with all files: this Dockerfile, the &lt;filename&gt;.tar.gz file
# 3) From this folder, run:
#       docker build --no-cache -t rocky9,myprogram:0.1 ./
# where the name 'rocky9,myprogram:0.1' is somewhat arbitrary and can be tinkered with
# 4) Fol#
# Sample dockerfile to illustrate how to setup a self-contained myprogram install. I'm using myprogram.contourer without GUI as a demonstration.
# 1) Install docker in the system
# 2) Create a folder with 3 files: this Dockerfile, the myprogram.contourer.tar.gz file and the Minuit2-master.zip file
# 3) From this folder, run:
#       docker build --no-cache -t rocky9,myprogram:0.1 ./
# where the name 'rocky9,myprogram:0.1' is somewhat arbitrary and can be tinkered with
# 4) Following it running fully, it will show up in the list of images that can be opened as
#       docker images --digests
# 5) Attach to this container thereafter by running 
#       docker run -it rocky9,myprogram:0.1
#   and exit from the session by 'exit'
#            -Sudarsan B, 16 Nov 2023, bsudarsan92-at-gmail.com
#
FROM rockylinux:9
LABEL maintainer=sud
LABEL version=0.1
COPY placeholderprogram.tar.gz /home/
RUN dnf upgrade -y --refresh &amp;&amp; \
 dnf group install -y "Development Tools" &amp;&amp; \
 dnf install -y readline-devel &amp;&amp; \
 dnf update &amp;&amp; \
 dnf install -y epel-release &amp;&amp; \
 dnf -y install root &amp;&amp; \
 dnf -y install nano 
WORKDIR /home/
ENV DOCKERHOME=.

RUN ls &amp;&amp; \
 ls /home/ &amp;&amp; \
 cd /home/ &amp;&amp; \
 tar -xvf placeholderprogram.tar.gz &amp;&amp; \
 mkdir /home/placeholderprogram/AprMay2024/ &amp;&amp; \
 cd placeholderprogram &amp;&amp; \
 make
CMD /bin/bash
</code></pre>
<p>Navigate to a directory containing a Dockerfile, and run the following:</p>
<pre><code>sudo docker build --no-cache -t docker.containername:0.1 .
</code></pre>
<p>It is nice to have a yaml file that allows one to tailor and create any maps between local and container directories, for ex. Do that by saving the following as gs_loader.yaml (say)</p>

<pre><code>services:
  rocky9.gs:
    # platform: linux/arm64,linux/amd64 
    build:
      context: .
#      additional_contexts:
#        - mysrc=${DOCKERHOME}/provisioning
#      dockerfile: ${DOCKERHOME}/DockerConfigs/GODDESS_SORT_Fedora.dockerfile
    environment:
      - DISPLAY=host.docker.internal:0
      - LANG=${LANG}
      - TERM=xterm-256color
    volumes:
      - /etc/localtime:/etc/localtime:ro
#      - ${DOCKERHOME}/AprMay2024:/home/placeholderprogram/AprMay2024
      - ./AprMay2024/:/home/placeholderprogram/AprMay2024
    stdin_open: true
    tty: true
</code></pre>

<p>The built docker container can be attached to by running the following:</p>
<pre><code>sudo docker compose -f gs_loader.yaml run rocky9.gs
</code></pre>

<p>And you will be in the container, reading and writing to the host’s AprMay2024 folder</p>]]></content><author><name>sudb</name></author><category term="Other" /><summary type="html"><![CDATA[(because the documentation sometimes gets too irritating)]]></summary></entry><entry><title type="html">CERN-ROOT and Code-Blocks</title><link href="https://sudb92.github.io/blog/2023/09/10/blog-post-title-from-file-name.html" rel="alternate" type="text/html" title="CERN-ROOT and Code-Blocks" /><published>2023-09-10T00:00:00+00:00</published><updated>2023-09-10T00:00:00+00:00</updated><id>https://sudb92.github.io/blog/2023/09/10/blog-post-title-from-file-name</id><content type="html" xml:base="https://sudb92.github.io/blog/2023/09/10/blog-post-title-from-file-name.html"><![CDATA[<p>An acquaintance recently wished to utilize a full program in CERN’s ROOT6 with Code::Blocks IDE on Linux/WSL because they found the interface more familiar from prior coding exercises. I hadn’t used an IDE in quite a long time so I found the prospect interesting to explore. There were a few weird hoops to jump through but I managed to figure it out. Here are the steps, since googling didn’t lead to a ready-to-go solution.</p>
<ul>
  <li>We had a custom Makefile that worked on bash, which uses <code>root-config</code> to dynamically assign compiler flags and libraries</li>
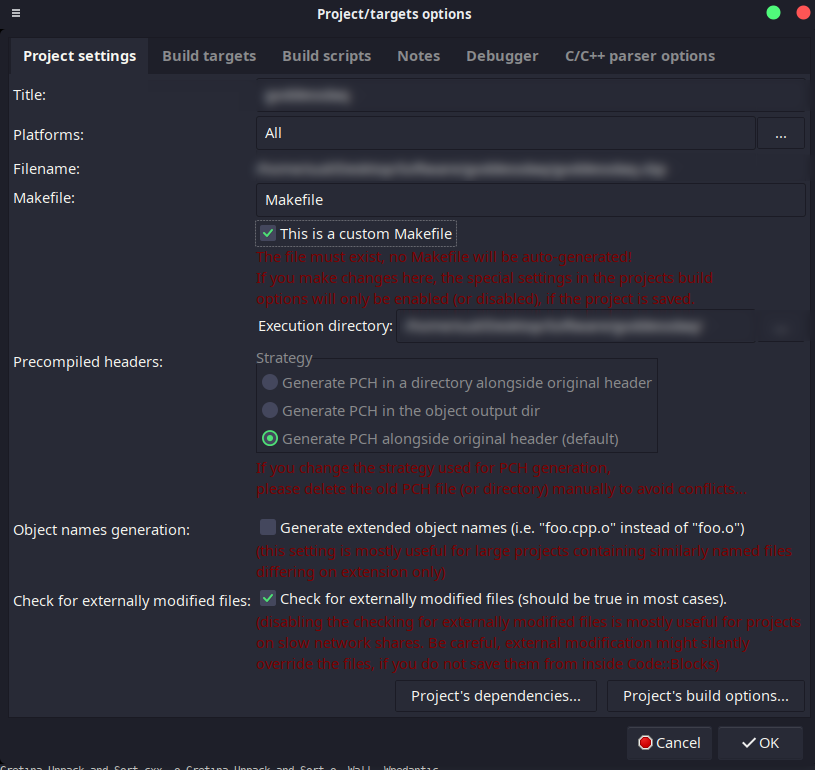
  <li><b>Fix 1</b>: Go to <code>Project &gt; Properties</code>
    <ul>
      <li>Tick “This is a custom Makefile”.</li>
      <li>If we don’t do this Code::Blocks will make assumptions about how to compile files. At first glance, the process seems to go by turning compile source (*.c, *.cpp etc) files to .o and trying to link all the .o’s together to an executable with the project’s name.</li>
    </ul>
  </li>
</ul>

<p><img src="https://sudb92.github.io/blog/images/2023-09-10-img1.png" alt="Screenshot-1" /></p>

<ul>
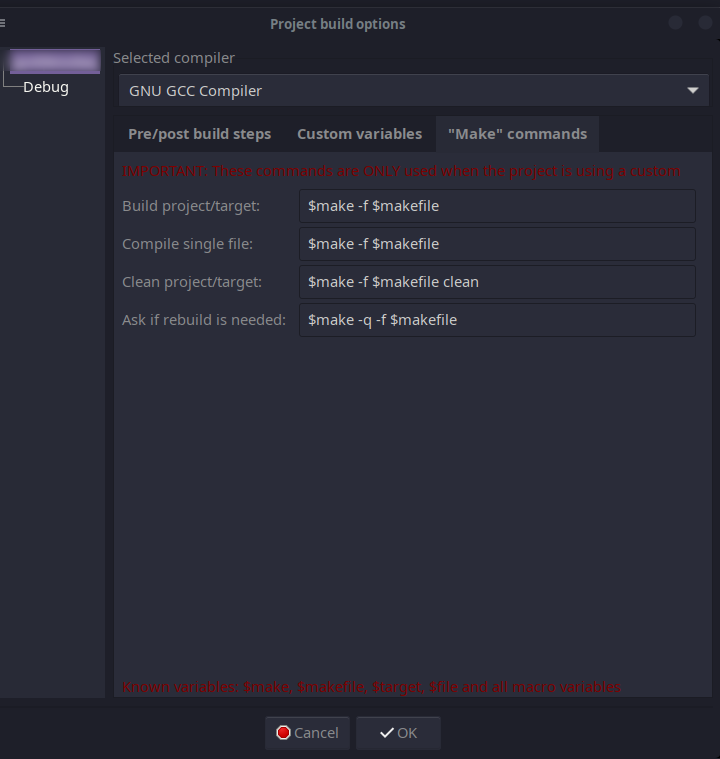
  <li><b>Fix 2</b>: If you now click ‘Build’, the default command that gets run would be <code>make -f Makefile Debug</code> or <code>make -f Makefile Release</code>, because Code::Blocks expects this sort of structure.
    <ul>
      <li>Sometimes, like in our case, you want some control on this behavior instead of redesigning the makefile.</li>
      <li>To fix this, go to <code>Project &gt; Properties &gt; Project's Build Options &gt; "Make" Commands</code>, and remove all mentions of <code>$target</code> in there. We only need <code>make -f Makefile</code> typically. Or, you could add whatever other ‘make’ switches/tricks you require here.</li>
    </ul>
  </li>
</ul>

<p><img src="https://sudb92.github.io/blog/images/2023-09-10-img2.png" alt="Screenshot-2" /></p>

<ul>
  <li><b>Fix 3</b>: Okay, let’s try compiling again after hitting “OK” as many times as needed so the settings above are saved.
    <ul>
      <li>If your Makefile has all the <code>root-config</code> mentions expanded out in full, things will run fine. But if you have our situation, and have the makefile literally use <code>root-config --cflags</code> etc as part of recipes, Code::Blocks will fail at the first mention of ‘root-config’ or ‘rootcint’ with something like <code>bash: line 1: root-config: command not found</code>.</li>
      <li>This happens because Code::Blocks does not have all the right paths in its global $PATH variable to ‘see’ root-config and other things hidden in $ROOTSYS/bin, with $ROOTSYS typically defined in .bashrc by running <code>source /path/to/root/bin/thisroot.sh</code>. What do we do? Skip the next step, I just had to put it in there so I remember it.</li>
      <li>I tried a few things that didn’t work, like adding ‘source ~/.bashrc’ in <code>Project &gt; Build Options &gt; Pre/Post Build Steps</code>, or doing a $PATH export there like <code>export PATH=$PATH:/&lt;path&gt;/&lt;to&gt;/&lt;root&gt;/bin/</code>. They didn’t do much as of CB version 20.03.</li>
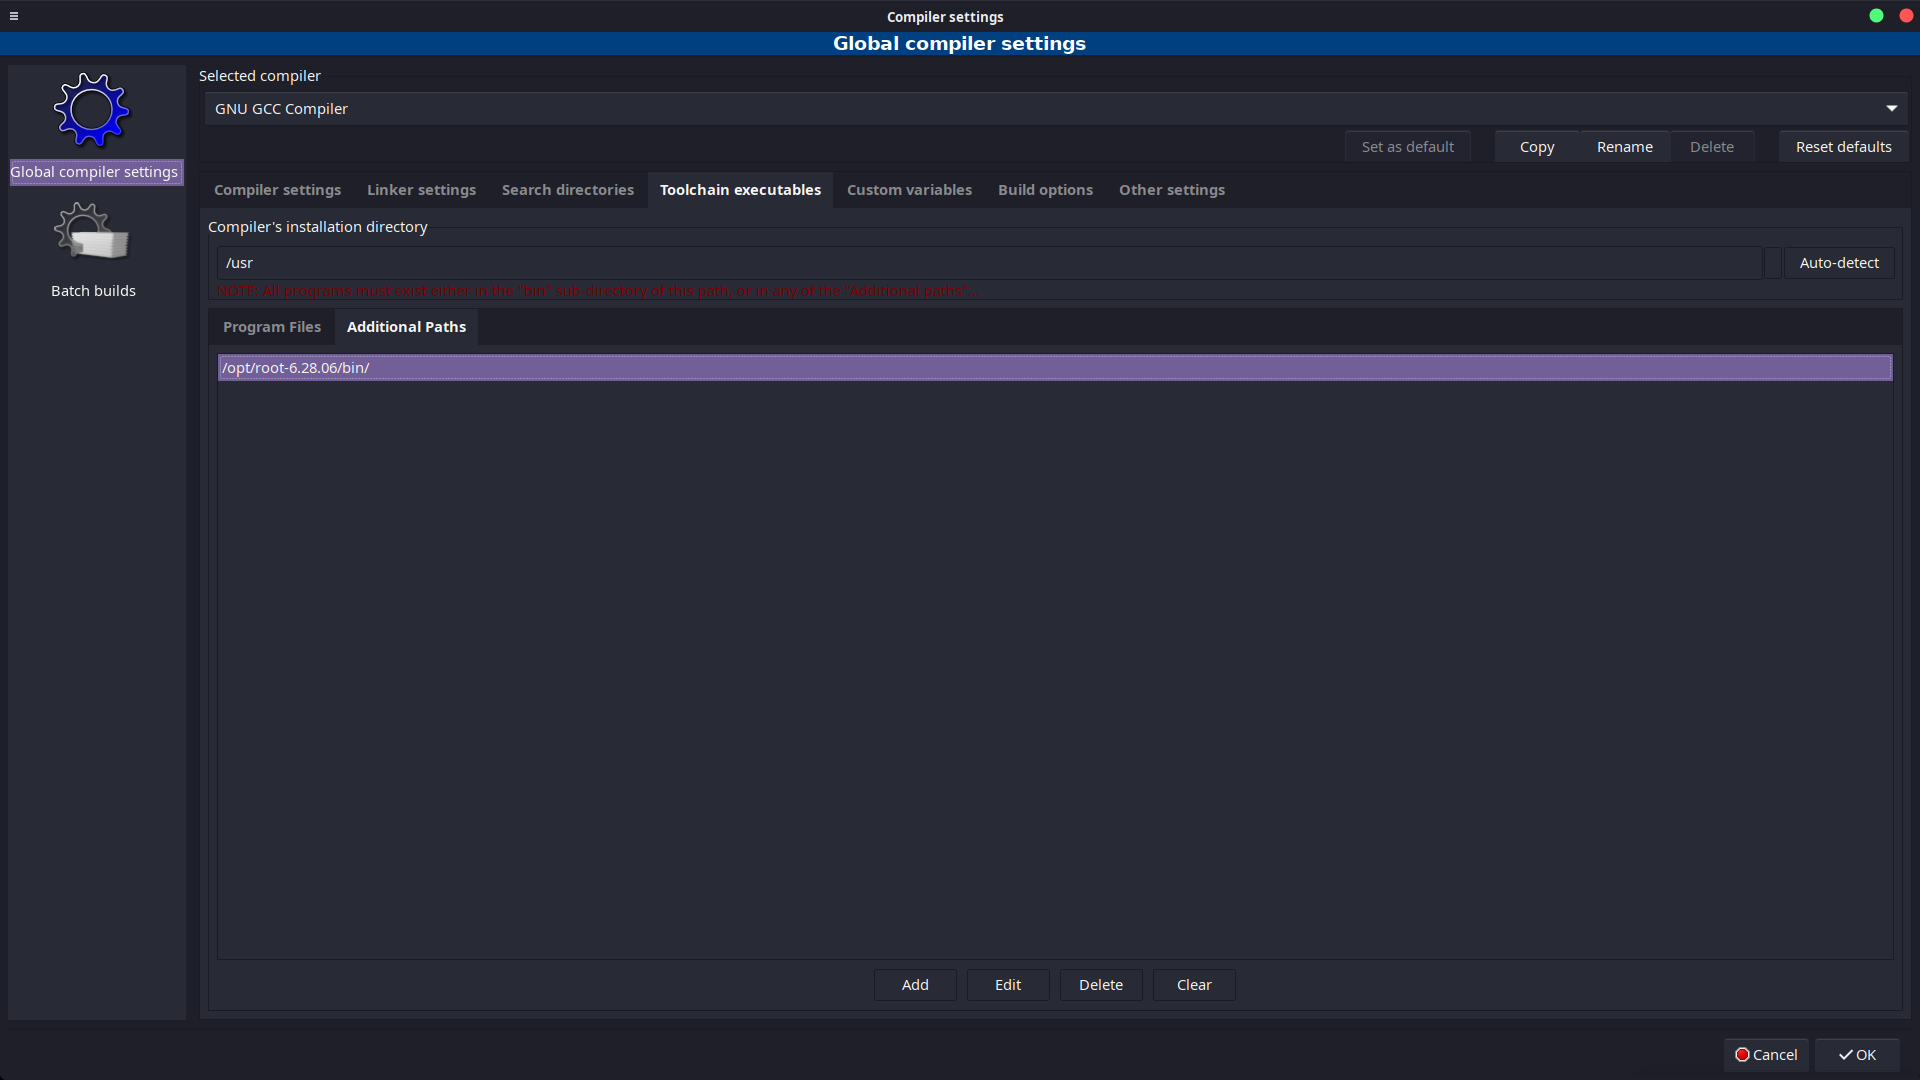
      <li>What <em>did</em> help, was navigating to <code>Settings &gt; Compiler &gt; Toolchain Executables &gt; Additional Paths</code> hidden away deep, and using <code>Add</code> to add, in our case, <code>/opt/root-6.28.06/bin/</code> which was the installation directory, containing root-config, rootcint, thisroot.sh etc. Following all this, running “Make” will do all it has to do, following the exact process <code>make all</code> would’ve done for us in bash, and bringing up the executable in an <code>xterm</code> window when we hit ‘run’.</li>
    </ul>
  </li>
</ul>

<p><img src="https://sudb92.github.io/blog/images/2023-09-10-img3.png" alt="Screenshot-3   ." /></p>

<ul>
  <li>Parting comment: There is something to be said about the convenience of the IDE telling you all about function syntaxes as you type them, and the option of doing debug-testing while being a little spoiled. Using a custom <code>Makefile</code> also gives us full control over how we compile the project, which was what originally dragged me away from half-cooked IDEs.</li>
  <li>Parting comment #2: <code>Settings &gt; Compiler.. &gt; Global Compiler Settings &gt; Search Directories &gt; Add</code> can be used to include a pathname to ROOT’s <code>include</code> directory, such as <code>/opt/root-6.28.06/include/</code>, which will then turn-on the extremely helpful ‘code-completion’ toolkit that auto-suggests function templates and similar details as you type. ROOT’s default online documentation landscape can be a little cumbersome to explore, this might help save some consternation when you’re trying to remember the exact order of an obscure constructor or method.</li>
</ul>

<p>Tested using:</p>

<pre><code>- GNU Make 4.3
- gcc 11.4
- Code::Blocks 20.03
- CERN ROOT v6.28.03
- All running in Ubuntu 22.04 with a Linux-6.2 Kernel
</code></pre>]]></content><author><name>sudb</name></author><category term="Other" /><summary type="html"><![CDATA[An acquaintance recently wished to utilize a full program in CERN’s ROOT6 with Code::Blocks IDE on Linux/WSL because they found the interface more familiar from prior coding exercises. I hadn’t used an IDE in quite a long time so I found the prospect interesting to explore. There were a few weird hoops to jump through but I managed to figure it out. Here are the steps, since googling didn’t lead to a ready-to-go solution. We had a custom Makefile that worked on bash, which uses root-config to dynamically assign compiler flags and libraries Fix 1: Go to Project &gt; Properties Tick “This is a custom Makefile”. If we don’t do this Code::Blocks will make assumptions about how to compile files. At first glance, the process seems to go by turning compile source (*.c, *.cpp etc) files to .o and trying to link all the .o’s together to an executable with the project’s name. Fix 2: If you now click ‘Build’, the default command that gets run would be make -f Makefile Debug or make -f Makefile Release, because Code::Blocks expects this sort of structure. Sometimes, like in our case, you want some control on this behavior instead of redesigning the makefile. To fix this, go to Project &gt; Properties &gt; Project's Build Options &gt; "Make" Commands, and remove all mentions of $target in there. We only need make -f Makefile typically. Or, you could add whatever other ‘make’ switches/tricks you require here. Fix 3: Okay, let’s try compiling again after hitting “OK” as many times as needed so the settings above are saved. If your Makefile has all the root-config mentions expanded out in full, things will run fine. But if you have our situation, and have the makefile literally use root-config --cflags etc as part of recipes, Code::Blocks will fail at the first mention of ‘root-config’ or ‘rootcint’ with something like bash: line 1: root-config: command not found. This happens because Code::Blocks does not have all the right paths in its global $PATH variable to ‘see’ root-config and other things hidden in $ROOTSYS/bin, with $ROOTSYS typically defined in .bashrc by running source /path/to/root/bin/thisroot.sh. What do we do? Skip the next step, I just had to put it in there so I remember it. I tried a few things that didn’t work, like adding ‘source ~/.bashrc’ in Project &gt; Build Options &gt; Pre/Post Build Steps, or doing a $PATH export there like export PATH=$PATH:/&lt;path&gt;/&lt;to&gt;/&lt;root&gt;/bin/. They didn’t do much as of CB version 20.03. What did help, was navigating to Settings &gt; Compiler &gt; Toolchain Executables &gt; Additional Paths hidden away deep, and using Add to add, in our case, /opt/root-6.28.06/bin/ which was the installation directory, containing root-config, rootcint, thisroot.sh etc. Following all this, running “Make” will do all it has to do, following the exact process make all would’ve done for us in bash, and bringing up the executable in an xterm window when we hit ‘run’. Parting comment: There is something to be said about the convenience of the IDE telling you all about function syntaxes as you type them, and the option of doing debug-testing while being a little spoiled. Using a custom Makefile also gives us full control over how we compile the project, which was what originally dragged me away from half-cooked IDEs. Parting comment #2: Settings &gt; Compiler.. &gt; Global Compiler Settings &gt; Search Directories &gt; Add can be used to include a pathname to ROOT’s include directory, such as /opt/root-6.28.06/include/, which will then turn-on the extremely helpful ‘code-completion’ toolkit that auto-suggests function templates and similar details as you type. ROOT’s default online documentation landscape can be a little cumbersome to explore, this might help save some consternation when you’re trying to remember the exact order of an obscure constructor or method. Tested using:]]></summary></entry></feed>